Today in this tutorial we are going to integrate jsf 2 and spring jdbc template while jsf 2 will be used for frontend with rich faces and spring jdbc to read and write operation and to perform CRUD.
We are going to use maven and pull dependencies we want from maven repository. So, it will be the maven project. We are also going to use jetbrains intellij IDEA (IDE) for this project.
Lets get started,
Step 1
File -> New Project -> Maven Projectand tick archetype button.- Scroll down to
org.richfaces.archetypes:richfaces-archetype-simpleappand expand. - Select
richfaces-archetype-simpleapp:4.5.17.Finaland press next.


I have chosen version 4.5.17.Final for my project because i was having trouble with version 5 as maven was not able to setup my project completely.
You may try different version, that might work with you. Give your project name and proceed until finish.
Step 2
Go to line : 136 by pressing control + G after that add these spring dependencies just after the line : 136.
|
1 2 3 4 5 6 7 8 9 10 11 12 13 14 15 16 17 18 19 20 21 22 23 24 25 26 27 28 29 30 31 32 33 34 35 36 37 38 39 |
<dependency> <groupId>org.springframework</groupId> <artifactId>spring-jdbc</artifactId> <version>4.1.5.RELEASE</version> </dependency> <dependency> <groupId>org.springframework</groupId> <artifactId>spring-context</artifactId> <version>4.1.5.RELEASE</version> </dependency> <dependency> <groupId>org.springframework</groupId> <artifactId>spring-webmvc</artifactId> <version>4.1.5.RELEASE</version> </dependency> <dependency> <groupId>org.springframework</groupId> <artifactId>spring-orm</artifactId> <version>4.1.5.RELEASE</version> <type>jar</type> <scope>compile</scope> </dependency> <dependency> <groupId>org.springframework</groupId> <artifactId>spring-beans</artifactId> <version>4.1.5.RELEASE</version> </dependency> <dependency> <groupId>mysql</groupId> <artifactId>mysql-connector-java</artifactId> <version>5.1.44</version> </dependency> |
If you have selected Auto-Import then it will start downloading all the spring dependency in your maven libraries.

Also create new database with MySQL workbench or through command line.
Step 3
1. Create new file named AppConfig.java inside <project_root>/src/main/java/<project_name> and paste this code inside it.
|
1 2 3 4 5 6 7 8 9 10 11 12 13 14 15 16 17 18 19 20 21 22 23 |
package jsf_springjdbc; import org.springframework.context.annotation.Bean; import org.springframework.context.annotation.ComponentScan; import org.springframework.context.annotation.Configuration; import org.springframework.jdbc.datasource.DriverManagerDataSource; import javax.sql.DataSource; @Configuration @ComponentScan(basePackages = "jsf_springjdbc") public class AppConfig { @Bean public DataSource getDataSource() { DriverManagerDataSource connectionSource = new DriverManagerDataSource(); connectionSource.setDriverClassName("com.mysql.jdbc.Driver"); connectionSource.setUrl("jdbc:mysql://localhost:3306/springjdbc_db"); connectionSource.setUsername("root"); connectionSource.setPassword(""); return connectionSource; } } |
2. Now, we need to create spring bean configuration file. Create new file inside <project_root>/src/main/webapp/WEB-INF called applicationContext.xml and paste these codes below :-
|
1 2 3 4 5 6 7 8 9 10 11 12 13 14 15 16 |
<?xml version="1.0" encoding="UTF-8"?> <beans xmlns="http://www.springframework.org/schema/beans" xmlns:xsi="http://www.w3.org/2001/XMLSchema-instance" xmlns:context="http://www.springframework.org/schema/context" xmlns:p="http://www.springframework.org/schema/p" xmlns:mvc="http://www.springframework.org/schema/mvc" xsi:schemaLocation="http://www.springframework.org/schema/beans http://www.springframework.org/schema/beans/spring-beans-3.1.xsd http://www.springframework.org/schema/context http://www.springframework.org/schema/context/spring-context-3.1.xsd http://www.springframework.org/schema/mvc http://www.springframework.org/schema/mvc/spring-mvc-3.1.xsd"> <context:component-scan base-package="jsf_springjdbc" /> </beans> |
Now, comes the view resolver tag. Open faces-config.xml which is inside your <project_root>/src/main/webapp/WEB-INF and paste this code between <faces-config> tag.
|
1 2 3 |
<application> <el-resolver> org.springframework.web.jsf.el.SpringBeanFacesELResolver</el-resolver> </application> |
Finally, the context listener. Open up web.xml file inside <project_root>/src/main/webapp/WEB-INF and these line of codes just below the <display-name> tag.
|
1 2 3 4 5 6 7 |
<listener> <listener-class>org.springframework.web.context.ContextLoaderListener</listener-class> </listener> <listener> <listener-class>com.sun.faces.config.ConfigureListener</listener-class> </listener> |
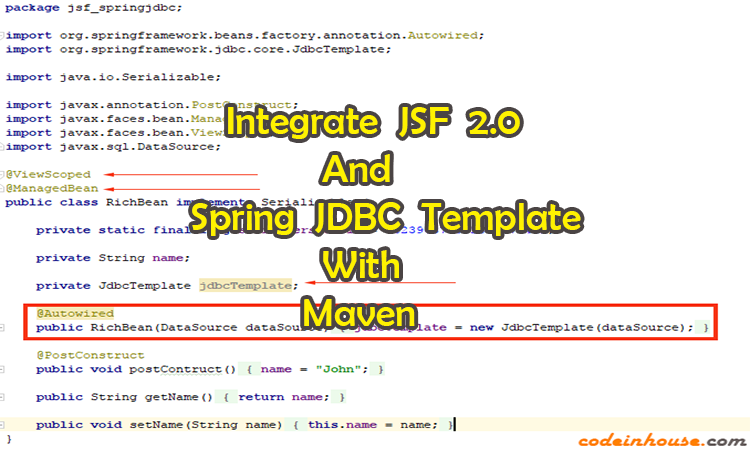
Finally, to use JdbcTemplate template in your class file. Open RichBean.java and use the JdbcTemplate like the image below :-

Also, your final directory structure will look like this.

This is it, If you like this tutorial thumbs up and comment if any problem.
Leave a Reply