Today’s post is going to be about setting up spring mvc project from scratch with hibernate using maven. We are going to setup it using java configuration so, that we dont have have any verbose code for both spring configuration as well as hibernate configuration.
If you want to learn about spring configurations using java code, xml and annotations you can check this category where we have list of all the configuration that we can make so far in spring mvc.
Let’s get started
What are we going to do ?
- Setup a Project.
- Add Required Maven Dependecies.
- Configure Spring with Java Code (No XML Configuration).
- Configure Hibernate Configuration with Java Code.
- Setup Controller.
- Run Project & Demo.
1. Setup a Project
I see many use the starter files and create project directly from the facilities provided by IDE’s itself. I did it too but everytime i need to configure something, it messed up.
So, this time i am going to setup everything from scratch and make sure we are good aware of the concepts we are going through.
Create a new empty project in intellij without any files inside it and we are going to add new file step by step.
Creating Files
Since we are going to setup a maven project we have to setup pom.xml and configure the maven compiler plugin based on the JDK version you have. So, create a folder and give the project name and create a new file inside it named as pom.xml and add the piece of starter maven config inside it.
|
1 2 3 4 5 6 7 8 9 10 11 12 13 14 15 16 17 18 19 |
<project xmlns="http://maven.apache.org/POM/4.0.0" xmlns:xsi="http://www.w3.org/2001/XMLSchema-instance" xsi:schemaLocation="http://maven.apache.org/POM/4.0.0 http://maven.apache.org/maven-v4_0_0.xsd"> <modelVersion>4.0.0</modelVersion> <groupId>com.learning</groupId> <artifactId>springmvc</artifactId> <packaging>war</packaging> <version>1.0-SNAPSHOT</version> <properties> <maven.compiler.source>18</maven.compiler.source> <maven.compiler.target>18</maven.compiler.target> </properties> <name>springmvc Maven Webapp</name> <url>http://maven.apache.org</url> <dependencies> </dependencies> <build> <finalName>springmvc</finalName> </build> </project> |
Avobe code has <maven.compiler.source> & <maven.compiler.target> which is kept as 18 which is the installed JDK version. Replace your currently installed JDK version with it.
Create a new folder named src inside your project folder and inside src create another folder called WebContent. In this folder i will add the view pages which will be served by the controller later. In the mean time you can create a index.jsp and write some content inside it
2. Add Required Maven Dependencies
So, to configure spring project we need to add spring depedencies into the project. Add the below dependencies into the pom.xml inside the <dependencies></dependencies> section.
|
1 2 3 4 5 6 7 8 9 10 11 12 13 14 15 16 17 18 19 20 21 |
<dependency> <groupId>org.springframework</groupId> <artifactId>spring-core</artifactId> <version>5.3.23</version> </dependency> <dependency> <groupId>org.springframework</groupId> <artifactId>spring-context</artifactId> <version>5.3.23</version> </dependency> <dependency> <groupId>org.springframework</groupId> <artifactId>spring-webmvc</artifactId> <version>5.3.23</version> </dependency> <dependency> <groupId>javax.servlet</groupId> <artifactId>javax.servlet-api</artifactId> <version>4.0.1</version> <scope>provided</scope> </dependency> |
Resolve the depedencies by doing mvn clean install either from IDE or from the commandline.
3. Configure Spring with Java Code (No XML Configuration)
Once you have added the depedencies. Its time to configure the spring project creating the configuration using java code. First you need to set the src folder as source root in the Intellij IDEA in order to create package directly from the IDE.
Right click the src folder and go to Mark Directory As -> Mark As Source Root
Now you can create packages inside the folder. Go ahead and create new package inside src which would be com.learning.springmvc.config.
It would create structure as com/learning/springmvc/config. Now inside the config folder create a file called AppConfig.java and configure the View Resolver.
Make sure to add @Configuration annotation to tell the sring about the configuration class. Also add the @ComponentScan and give the base package for the spring to scan for the beans.
|
1 2 3 4 5 6 7 8 9 10 11 12 13 14 15 16 |
@Configuration @EnableWebMvc @ComponentScan(basePackages="com.maven.spring") public class AppConfig { @Bean public ViewResolver viewResolver() { InternalResourceViewResolver viewResolver = new InternalResourceViewResolver(); viewResolver.setPrefix("/"); viewResolver.setSuffix(".jsp"); return viewResolver; } } |
Also create another file called DispatcherServlet.java and extend the AbstractAnnotationConfigDispatcherServletInitializer we are going to override some of the methods to serve up the jsp files inside WebContent where our controller redirect accroding to our requests.
Take a look at the code below :-
|
1 2 3 4 5 6 7 8 9 10 11 12 13 14 15 16 |
public class DispatcherServlet extends AbstractAnnotationConfigDispatcherServletInitializer { @Override protected Class<?>[] getRootConfigClasses() { return null; } @Override protected Class<?>[] getServletConfigClasses() { return new Class[] { AppConfig.class }; } @Override protected String[] getServletMappings() { return new String[] { "/" }; } } |
Since, we have configured our view resolver, now we will have 3 things to do.
- Configure Tomcat
- Configure Project Structure in Intellij.
1. Configure Tomcat
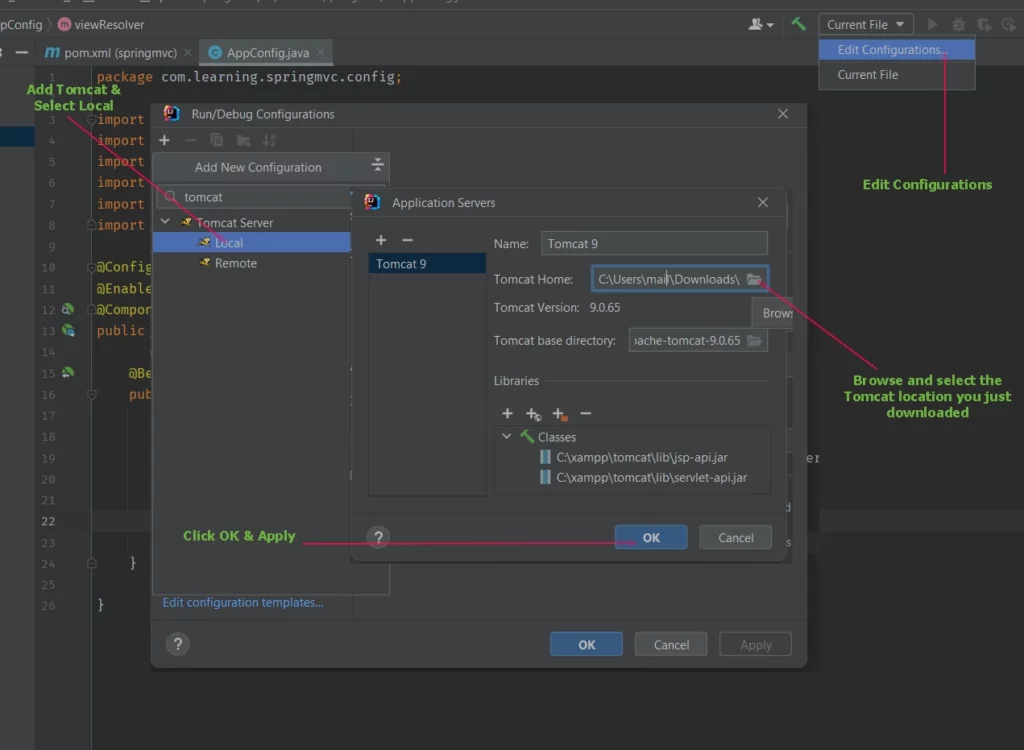
Current version of spring at the time of writing supports Tomcat 9. Download it from here and follow the steps below to configure the deployment in Intellij IDEA.

Now go to deployments and fix the artifact and select springmvc:war exploded.

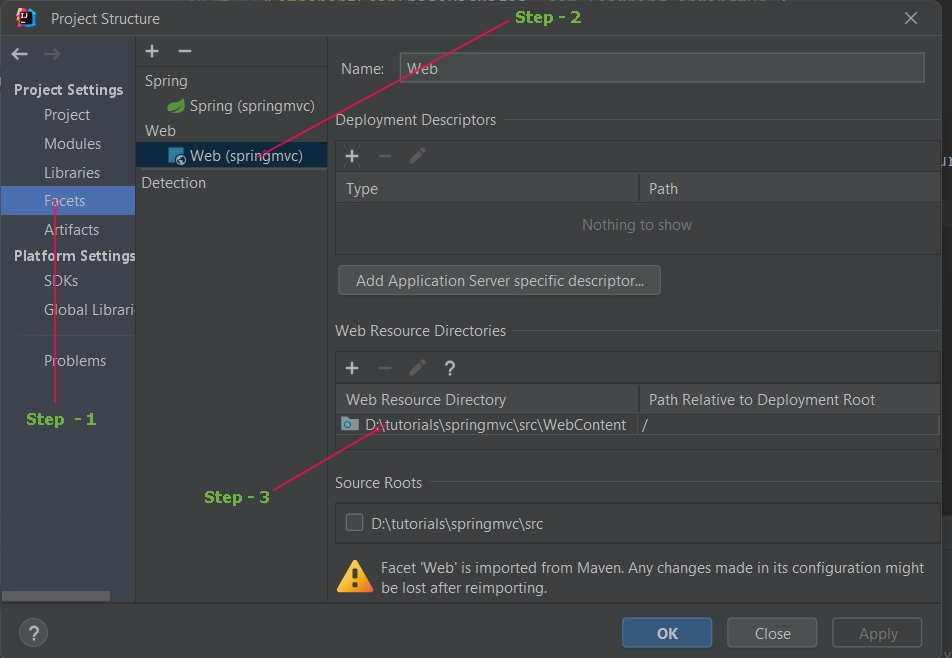
2. Configure Project Structure
Press Control + Alt + Shift + S on windows which will open the project structure window. Go to artificats, Click Web and Change the Web Sources Directory to WebContent

4. Configure Hibernate Configuration with Java Code
So, its time to configure hibernate to do your database stuffs. We are also configuring hibernate with java code without having to use xml configuration.
First add the required dependencies for the hibernate in your pom.xml file.
|
1 2 3 4 5 6 7 8 9 10 11 12 13 14 15 16 17 18 19 20 |
<dependency> <groupId>org.springframework</groupId> <artifactId>spring-orm</artifactId> <version>5.3.23</version> </dependency> <dependency> <groupId>org.hibernate</groupId> <artifactId>hibernate-core</artifactId> <version>5.6.11.Final</version> </dependency> <dependency> <groupId>org.hibernate</groupId> <artifactId>hibernate-validator</artifactId> <version>5.4.1.Final</version> </dependency> <dependency> <groupId>mysql</groupId> <artifactId>mysql-connector-java</artifactId> <version>8.0.30</version> </dependency> |
Make sure to add the supported version of hibernate and spring else you may encounter some of the issues with the version between spring and hibernate.
Next, you need to configure the hibernate configuration. Most of the people do it with xml but we configure everything with hibernate. After all we are coders we love to code not to xml.
Check the below hibernate configuration and add it inside your com.learning.springmvc.config package.
|
1 2 3 4 5 6 7 8 9 10 11 12 13 14 15 16 17 18 19 20 21 22 23 24 25 26 27 28 29 30 31 32 33 34 35 36 37 38 39 40 41 42 43 44 45 46 47 48 49 50 51 52 53 54 55 56 57 58 59 60 |
package com.learning.springmvc.config; import org.springframework.beans.factory.annotation.Autowired; import org.springframework.context.annotation.Bean; import org.springframework.context.annotation.ComponentScan; import org.springframework.context.annotation.Configuration; import org.springframework.context.annotation.PropertySource; import org.springframework.core.env.Environment; import org.springframework.jdbc.datasource.DriverManagerDataSource; import org.springframework.orm.hibernate5.HibernateTransactionManager; import org.springframework.orm.hibernate5.LocalSessionFactoryBean; import org.springframework.transaction.annotation.EnableTransactionManagement; import javax.sql.DataSource; import java.util.Properties; @Configuration @EnableTransactionManagement @ComponentScan(basePackages = {"com.learning.springmvc"}) @PropertySource("classpath:application.properties") public class HibernateConfig { @Autowired private Environment environment; @Bean public LocalSessionFactoryBean sessionFactory() { LocalSessionFactoryBean sessionFactory = new LocalSessionFactoryBean(); sessionFactory.setDataSource(dataSource()); sessionFactory.setPackagesToScan("com.learning.springmvc"); sessionFactory.setHibernateProperties(hibernateProperties()); return sessionFactory; } @Bean public DataSource dataSource() { DriverManagerDataSource dataSource = new DriverManagerDataSource(); dataSource.setDriverClassName(environment.getRequiredProperty("jdbc.driverClassName")); dataSource.setUrl(environment.getRequiredProperty("mysql.url")); dataSource.setUsername(environment.getRequiredProperty("mysql.username")); dataSource.setPassword(environment.getRequiredProperty("mysql.password")); return dataSource; } private Properties hibernateProperties() { Properties properties = new Properties(); properties.put("hibernate.dialect", environment.getRequiredProperty("hibernate.dialect")); properties.put("hibernate.show_sql", environment.getRequiredProperty("hibernate.show_sql")); properties.put("hibernate.format_sql", environment.getRequiredProperty("hibernate.format_sql")); properties.put("hibernate.hbm2ddl.auto", environment.getRequiredProperty("hibernate.hbm2ddl.auto")); return properties; } @Bean public HibernateTransactionManager getTransactionManager() { HibernateTransactionManager transactionManager = new HibernateTransactionManager(); transactionManager.setSessionFactory(sessionFactory().getObject()); return transactionManager; } } |
Finally, we are end of our project setup. Now all we have to do is create a controller and serve up a view to check if everything works fine. Lets check it by creating new controller inside the com.learning.springmvc.controller called HomeController and add these line of code.
|
1 2 3 4 5 6 7 8 |
@Controller public class HomeController { @RequestMapping(value="/user" method=RequestMethod.GET) public String index() { return "index"; } } |
By now your folder structure should look like this below.

Finally, if you want to learn more about hibernate checkout this documentation. But for little demonstration, we will have the demo on how to use the hibernate inside the project.
|
1 2 3 4 5 6 7 8 9 10 11 12 13 14 15 16 17 18 19 20 21 22 23 24 25 26 27 28 29 30 31 32 33 34 35 36 37 38 39 40 41 42 43 44 |
package com.learning.springmvc.Entity; import org.springframework.stereotype.Component; import javax.persistence.*; @Entity @Table(name="users") public class User { @Id @GeneratedValue(strategy = GenerationType.IDENTITY) @Column(name="id") private int id; @Column(name="name") private String name; @Column(name="email") private String email; public String getName() { return name; } public void setName(String name) { this.name = name; } public String getEmail() { return email; } public void setEmail(String email) { this.email = email; } public String getPassword() { return password; } public void setPassword(String password) { this.password = password; } } |
|
1 2 3 4 5 6 7 8 9 10 11 12 13 14 15 16 17 18 19 |
@Controller public class HomeController { @Autowired HomeService homeService; @RequestMapping(value={"/", "/home"}, method= RequestMethod.GET) public String index() { return "index"; } @RequestMapping(value="/user", method= RequestMethod.GET) public String getUser(Model model) { String name = homeService.getUser(); System.out.println(name); model.addAttribute("userName", name); return "index"; } } |
|
1 2 3 4 5 6 7 8 9 10 11 12 13 |
@Service public class HomeService { @Autowired SessionFactory sessionFactory; @Transactional public String getUser() { Session session = sessionFactory.getCurrentSession(); User user = session.get(User.class, 1); return user.getName(); } } |
Also you can check our blog in future to know more about advaned hibernate mappings and how to map the fields from code to database and learn to use hibernate properly in your projects.


Leave a Reply