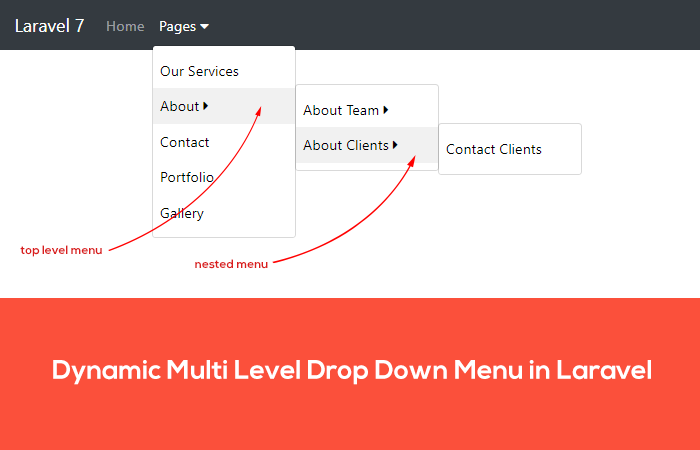
In this tutorial, we are going to learn how to create multi level dynamic menu in laravel using bootstrap. Recently I have been working on the laravel navigation menu. I also have created a single level drop down menu in laravel. You can visit this article in this link to on how to create single level drop down menu.
So, today we are finally going to create a dynamic menu and submenu in laravel which fetches the menu list from database and create dynamic menu. The most amazing this of this multi level menu is that you can go as many levels as you want.
I guess you have made your laravel project and database ready to get started.
let’s get started.
Creating Multilevel Dynamic Menu and Submenu in Laravel
What are we going to do?
- Create a model, migration, and define the table structure.
- Prepare dummy data.
- Define the relationship in the model and create a menu controller and fetch menu list from database in the tree view.
- Creating a navigation menu.
Prepare Model, Migration and Define Table Structure
The first step to do is create a model and migration and define a table structure for our menus in the database. So head over the terminal and type the following:-
php artisan make:model Menu -m
If you come from an older version of laravel models used to be stored inside the app directory but now these are moved inside app/models directory.
Once the model and migration have been created. Open the migration file and add the lines below to create the table structure.
|
1 2 3 4 5 6 7 8 9 10 11 |
public function up() { Schema::create('menus', function (Blueprint $table) { $table->id(); $table->string('menu_title', 255)->default(NULL); $table->integer('parent_id')->default(0); $table->string('sort_order')->default(0); $table->string('slug', 255)->default(NULL); $table->timestamps(); }); } |
Now, we can hit php artisan migrate in our terminal to make our tables ready to start and preparing dummy data.
Preparing Dummy Data
There are two options to prepare dummy data into the database. Creating a seeder or directly loading it into your database using Xampp.
Option 1: Using Xampp
If you have xampp installed in your machine. Just execute these queries into your database & add these records to your database.
|
1 2 3 4 5 6 7 8 9 10 11 12 |
INSERT INTO `menus` (`id`, `menu_title`, `parent_id`, `sort_order`, `slug`, `created_at`, `updated_at`) VALUES (1, 'Home', 0, '0', '/', '2020-09-26 01:10:58', '2020-09-26 01:10:58'), (2, 'Pages', 0, '1', '/pages', '2020-09-26 01:10:58', '2020-09-26 01:10:58'), (3, 'Our Services', 2, '2', '/our-services', '2020-09-26 01:10:58', '2020-09-26 01:10:58'), (4, 'About', 2, '3', '/about', '2020-09-26 01:10:58', '2020-09-26 01:10:58'), (5, 'About Team', 4, '3', '/about-team', '2020-09-26 01:10:58', '2020-09-26 01:10:58'), (6, 'About Clients', 4, '3', '/about-clients', '2020-09-26 01:10:58', '2020-09-26 01:10:58'), (7, 'Contact Team', 5, '3', '/contact-team', '2020-09-26 01:10:58', '2020-09-26 01:10:58'), (8, 'Contact Clients', 6, '3', '/contact-clients', '2020-09-26 01:10:58', '2020-09-26 01:10:58'), (9, 'Contact', 2, '4', '/contact', '2020-09-26 01:10:58', '2020-09-26 01:10:58'), (10, 'Portfolio', 2, '4', '/portfolio', '2020-09-26 01:10:58', '2020-09-26 01:10:58'), (11, 'Gallery', 2, '4', '/gallery', '2020-09-26 01:10:58', '2020-09-26 01:10:58'); |
Option 2: Using Seeder
To make a seeder type php artisan make:seeder MenuSeeder. Once the MenuSeeder is created inside your project database/seeds directory. Open it and paste these codes for dummy data below.
|
1 2 3 4 5 6 7 8 9 10 11 12 13 14 15 16 17 18 19 |
public function run() { $menus = [ ['menu_title' => 'Home', 'parent_id' => 0, 'sort_order' => 0, 'slug' => '/'], ['menu_title' => 'Pages', 'parent_id' => 0, 'sort_order' => 1, 'slug' => '/pages'], ['menu_title' => 'Our Services', 'parent_id' => 2, 'sort_order' => 2, 'slug' => '/our-services'], ['menu_title' => 'About', 'parent_id' => 2, 'sort_order' => 3, 'slug' => '/about'], ['menu_title' => 'About Team', 'parent_id' => 4, 'sort_order' => 3, 'slug' => '/about-team'], ['menu_title' => 'About Clients', 'parent_id' => 4, 'sort_order' => 3, 'slug' => '/about-clients'], ['menu_title' => 'Contact Team', 'parent_id' => 5, 'sort_order' => 3, 'slug' => '/contact-team'], ['menu_title' => 'Contact Clients', 'parent_id' => 6, 'sort_order' => 3, 'slug' => '/contact-clients'], ['menu_title' => 'Contact', 'parent_id' => 2, 'sort_order' => 4, 'slug' => '/contact'], ['menu_title' => 'Portfolio', 'parent_id' => 2, 'sort_order' => 4, 'slug' => '/portfolio'], ['menu_title' => 'Gallery', 'parent_id' => 2, 'sort_order' => 4, 'slug' => '/gallery'] ]; foreach ($menus as $menu) { \App\Models\Menu::Create($menu); } } |
Finally, register it inside your DatabaseSeeder.php
|
1 2 3 4 |
public function run() { $this->call([MenuSeeder::class]); } |
After everything is done. Type php artisan db:seed. If anything goes wrong or there are problems adding data into the database. Type php artisan migrate:refresh and again hit the db:seed again.
It will delete the database and create new tables seeds that will insert the dummy data again into the database.
Define Relationship & Creating Controller and Fetch Menu List
Now, we need to define a relationship inside our app/models/Menu.php to fetch the parent menu and all its children while fetching the menu list. to do this add these lines inside our app/models/Menu.php.
|
1 2 3 4 5 6 7 8 9 10 11 12 13 14 15 |
public function parent() { return $this->hasOne('App\Models\Menu', 'id', 'parent_id')->orderBy('sort_order'); } public function children() { return $this->hasMany('App\Models\Menu', 'parent_id', 'id')->orderBy('sort_order'); } public static function tree() { return static::with(implode('.', array_fill(0, 100, 'children')))->where('parent_id', '=', '0')->orderBy('sort_order')->get(); } |
Create a new MenuController by typing php artisan make:controller in your terminal. Add these lines of code.
|
1 2 3 4 5 6 7 8 9 10 11 12 13 14 15 |
<?php namespace App\Http\Controllers; use Illuminate\Http\Request; class MenuController extends Controller { public function getMenu() { $menu = new \App\Models\Menu; $menuList = $menu->tree(); return view('index')->with('menulist', $menuList); } } |
Make sure to register your controller in routes.
routes/web.php
|
1 |
Route::get('/', 'App\Http\Controllers\MenuController@getMenu'); |
Creating a Navigation Menu
Finally, it is time to create a view. Inside your resources/views in your index.blade.php file or where you want to display your navigation bar.
|
1 2 3 4 5 6 7 8 9 10 11 12 13 14 15 16 17 18 19 20 21 22 23 24 25 26 27 28 29 30 31 32 33 34 35 36 |
<body> <link rel="stylesheet" href="https://stackpath.bootstrapcdn.com/bootstrap/4.5.2/css/bootstrap.min.css" /> <link rel="stylesheet" href="https://cdnjs.cloudflare.com/ajax/libs/font-awesome/5.14.0/css/all.min.css" integrity="sha512-1PKOgIY59xJ8Co8+NE6FZ+LOAZKjy+KY8iq0G4B3CyeY6wYHN3yt9PW0XpSriVlkMXe40PTKnXrLnZ9+fkDaog==" crossorigin="anonymous" /> <style> .dropdown-menu .nav-item a { color: #000 !important; } .dropdown-toggle:after { content: none; } .dropdown-menu .dropdown-menu { margin-left: 0; margin-right: 0; } .dropdown-menu li { position: relative } .nav-item .submenu { display: none; position: absolute; left: 100%; top: -7px; } .dropdown-menu>li:hover { background-color: #f1f1f1; } .dropdown-menu>li:hover>.submenu { display: block; } </style> <nav class="navbar navbar-expand-lg navbar-dark bg-dark"> <a class="navbar-brand">Laravel 7</a> <ul class="navbar-nav mr-auto"> @each('submenu', $menulist, 'menu', 'empty') </ul> </nav> <script src="https://code.jquery.com/jquery-3.5.1.min.js" integrity="sha256-9/aliU8dGd2tb6OSsuzixeV4y/faTqgFtohetphbbj0=" crossorigin="anonymous"></script> <script src="https://stackpath.bootstrapcdn.com/bootstrap/4.5.2/js/bootstrap.min.js"></script> <script type="text/javascript"> $(document).on('click', '.dropdown-menu', ($event) => $event.stopPropagation()); if ($(window).width() < 992) { $('.dropdown-menu a').click(($event) => { $event.preventDefault(); if ($(this).next('.submenu').length) { $(this).next('.submenu').toggle(); } $('.dropdown').on('hide.bs.dropdown', () => $(this).find('.submenu').hide()); }); } </script> </body> |
We need to run of the recursive loop in order to get children inside children so we are going to create a new file called submenu.blade.php and run it over @each function like in the blade above.
So go ahead and copy these codes of the bootstrap navigation menu to display children inside menus and submenus.
|
1 2 3 4 5 6 7 8 9 10 11 12 13 14 15 16 17 18 19 20 21 22 23 24 25 |
@if ((count($menu->children) > 0) AND ($menu->parent_id > 0)) <li class="nav-item dropdown"> <a href="{{ url($menu->slug) }}" class="nav-link dropdown-toggle" role="button" data-toggle="dropdown"> {{ $menu->menu_title }} @if(count($menu->children) > 0) <i class="fa fa-caret-right"></i> @endif </a> @else <li class="nav-item @if($menu->parent_id === 0 && count($menu->children) > 0) dropdown @endif"> <a href="{{ url($menu->slug) }}" class="nav-link dropdown-toggle" data-toggle="dropdown"> {{ $menu->menu_title }} @if(count($menu->children) > 0) <i class="fa fa-caret-down"></i> @endif </a> @endif @if (count($menu->children) > 0) <ul class="@if($menu->parent_id !== 0 && (count($menu->children) > 0)) submenu @endif dropdown-menu" aria-labelledby="dropdownBtn"> @foreach($menu->children as $menu) @include('submenu', $menu) @endforeach </ul> @endif </li> |
Finally, hit php artisan serve and check out on your web browser for multi level dynamic menu in laravel.
If you can visit my link you have a problem regarding following my tutorial. Also, if any problem contact through the contact page on the website.
Leave a Reply